EnGBA logo

EnGBA

A C++ Game Boy Advance emulator focusing on accurate emulation and modern architecture.

April 2026

Source Code

Tech Stack

Development Blog Posts

Nostalgia

April 22, 2026

Tomodachi Life: Living the Dream recently released and I've been seeing everyone play it. It brought back so many memories of playing the original Tomodachi Life on the Nintendo 3DS back in the day.

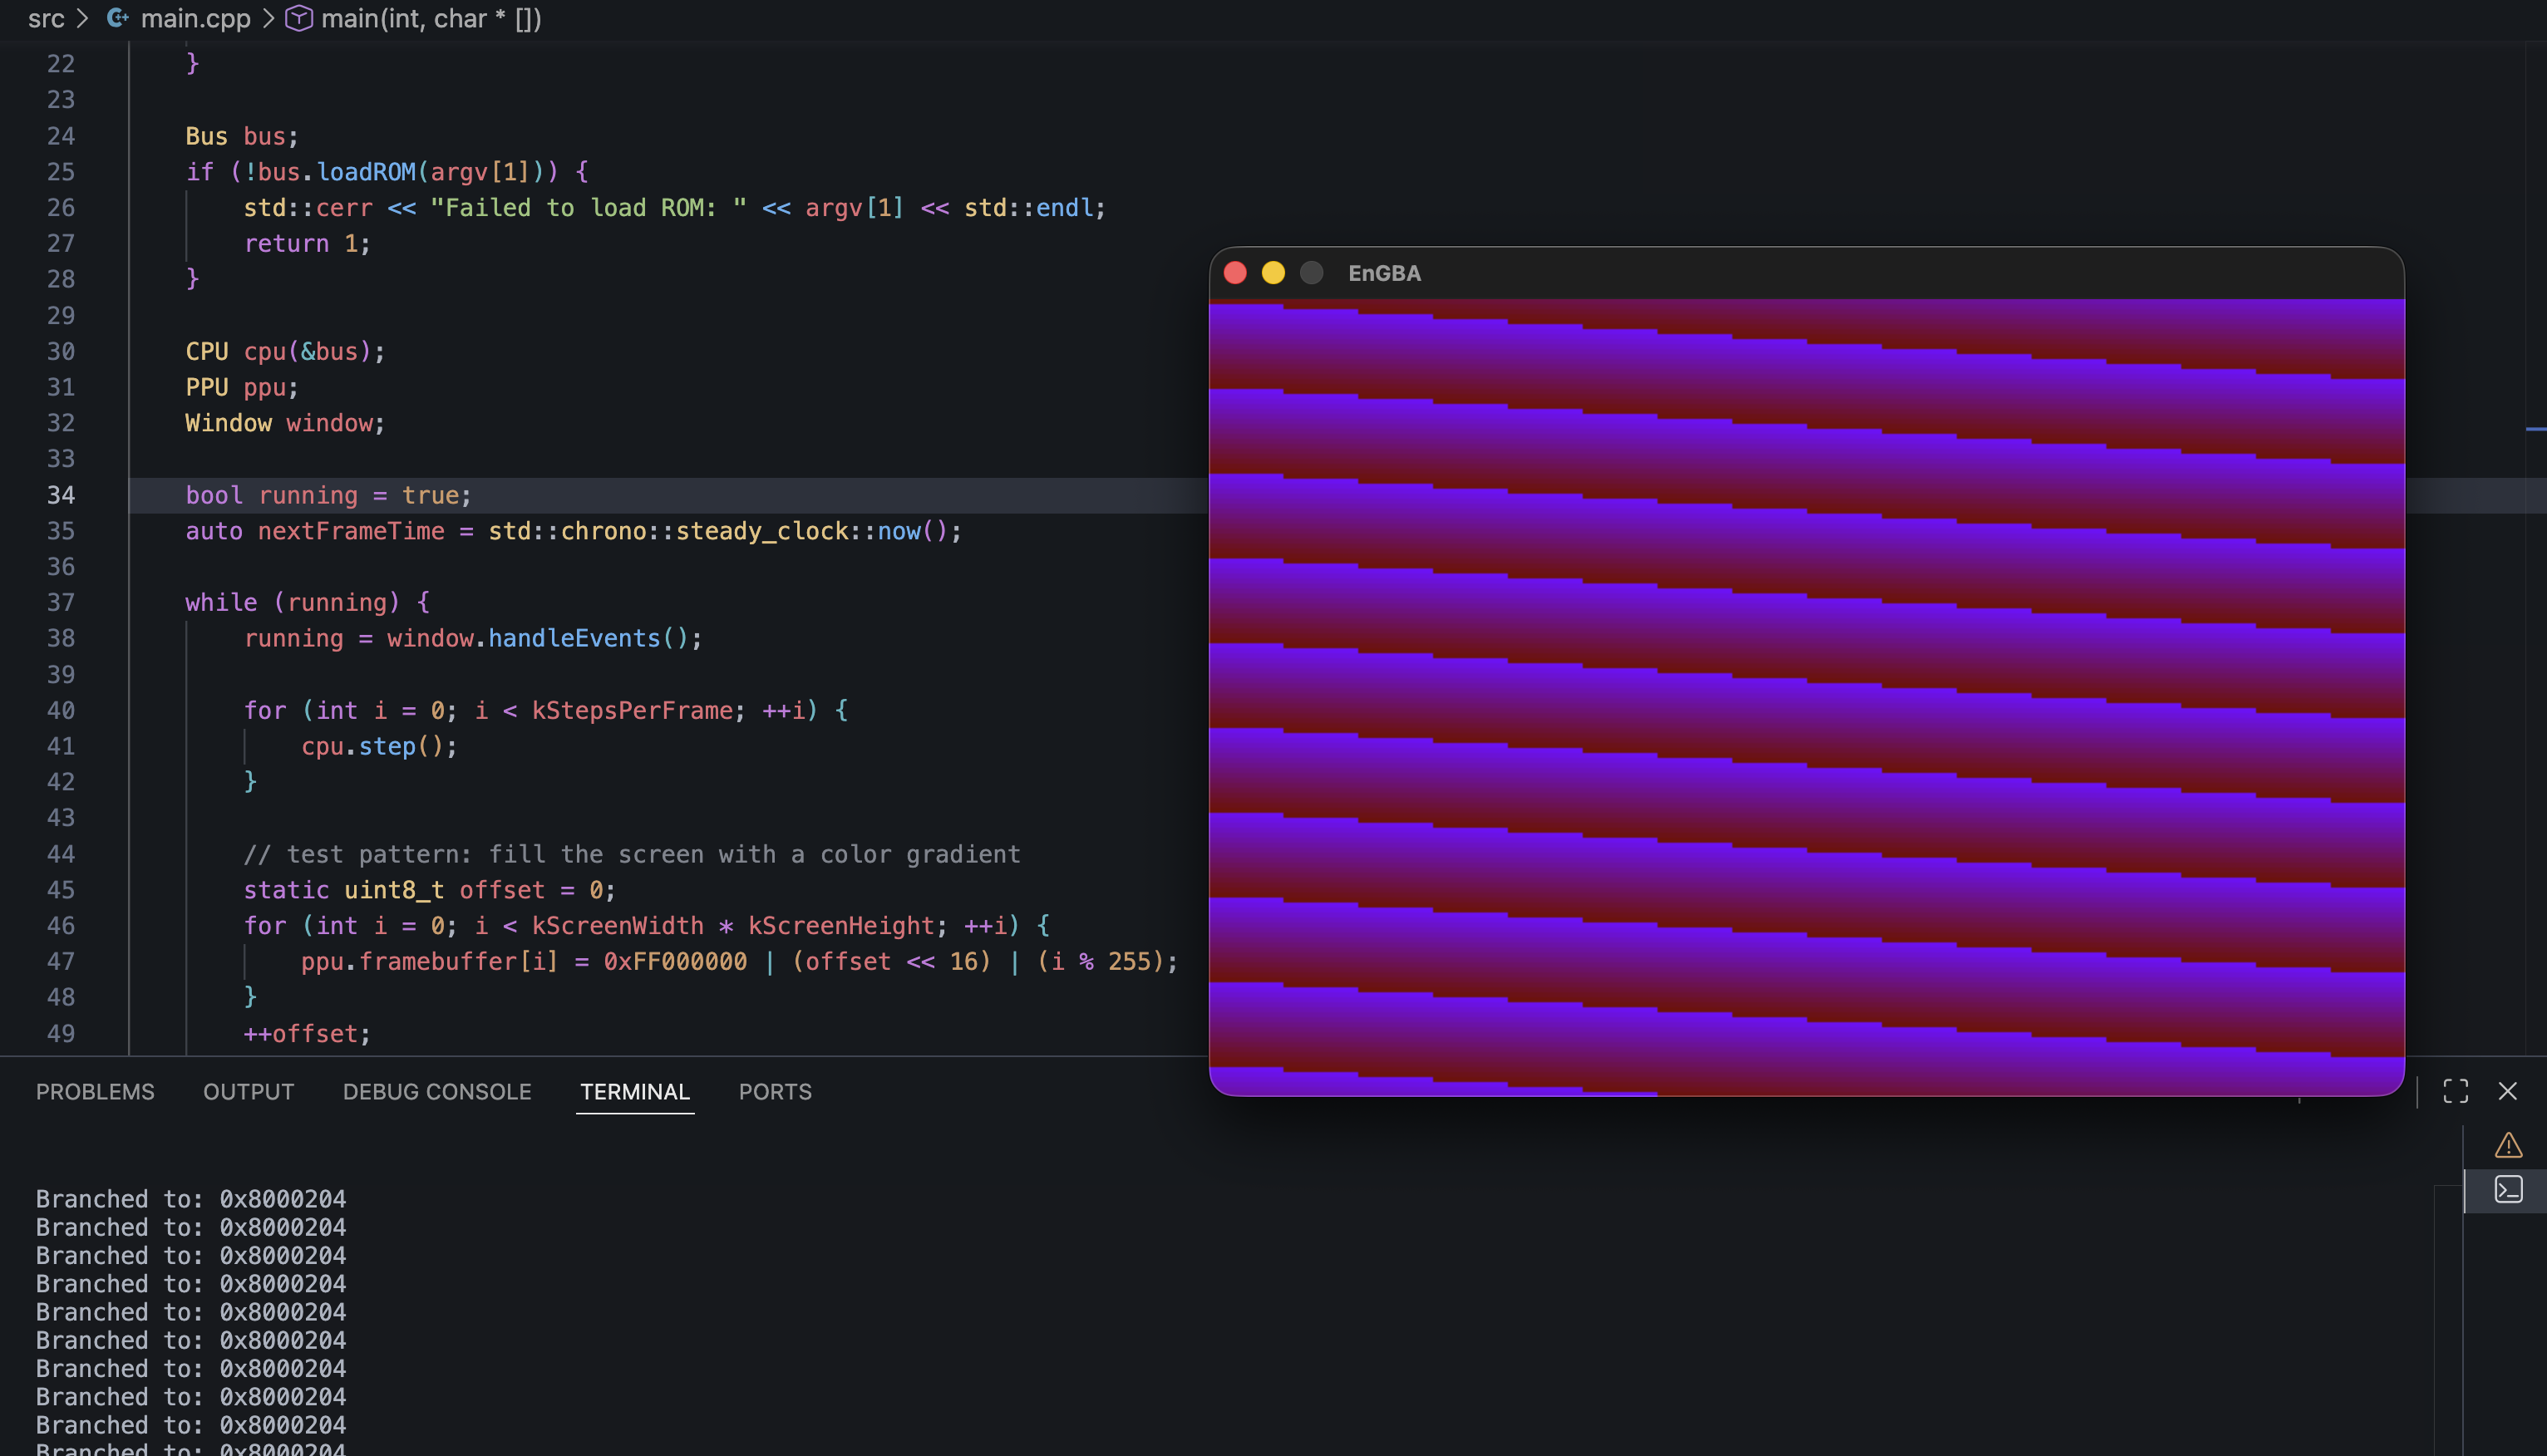
Revisiting that nostalgia made me remember that I was also curious about how these games worked. I've never used a Game Boy Advance, but how does a system as limited as the GBA handle everything from sprite rendering to input to game logic so seamlessly? What's really happening behind the scenes when a game feels this responsive and alive?

Even besides that, how is it possible that something that isn't a GBA can run GBA games at all?

After doing some research, most of the concepts behind how emulators work were familiar to me. Memory management, hardware interrupts, I/O & DMA, and much more were all concepts I had learned recently while studying computer architecture and operating systems.

So, that was enough for me to decide to build the GBA emulator, it'll be fun of course, but challenging enough to keep me learning and engaged for a while, and I can document the process along the way.

— Montasir

Skeleton

April 22, 2026

I started coding the emulator by setting up the part that everything else depends on per the architecture, memory.

The GBA has a pretty strict memory layout, so I built a Bus class that knows how to route reads and writes to the right place. The CPU doesn't care about “RAM” or “ROM”, it just throws addresses around, so the Bus has to translate those into actual storage.

I added the main regions I need for now:

  • External RAM
  • Internal RAM
  • Game Cartridge

Each one is just a vector of bytes, but the Bus handles the offsets and boundaries. It already feels like a real system once you can load a ROM file into memory and read from it.

After that, I set up the CPU state. All the registers, the CPSR, and the starting PC at 0x08000000. The CPU can step, even though the step function barely does anything yet. But the structure is there.

From there, I wired everything together in main.cpp. It loads the ROM, initializes the Bus and CPU, and runs a loop that calls cpu.step() a bunch of times. I also added a basic PPU stub with a 240x160 framebuffer, plus a small SDL2 window layer so I can actually see something on screen.

Right now the PPU isn't rendering tiles or sprites. Instead, I'm filling the framebuffer with a simple color gradient each frame just to confirm the loop, timing, and window are all working. It's the first time EnGBA has produced any kind of visual output, even if it's just a shifting pattern.

It's not a real emulator yet, but it's a skeleton that boots, ticks forward, and draws pixels. That's enough to move on to the fun part next: implementing data processing instructions.

Image 1

Tiny demo of the pattern after running:

cd EnGBA
mkdir -p build && cd build
cmake ..
make
./EnGBA <my-rom-path>

— Montasir

Instructions

April 23, 2026

The GBA's CPU is an ARM7TDMI, which means it can run instruction sets ARM (32-bit) and THUMB (16-bit). I started with ARM since most of the boot sequence uses it.

Data processing instructions are the core of the CPU. MOV, ADD, SUB, AND, ORR, all the basic operations that every program relies on. I spent today implementing the decoder and executor for these.

The tricky part is handling all the condition codes and flags. ARM instructions can execute conditionally based on CPSR flags, so I had to write a function that checks if an instruction should actually run. Then there's the barrel shifter that can apply shifts or rotates to operands before the operation happens.

I added support for the main operations:

  • MOV and MVN
  • ADD, ADC, SUB, and RSB
  • AND, ORR, EOR, and BIC
  • CMP, CMN, TST, and TEQ

Each one updates flags when needed, handles the shifter operand, and writes results back to the correct register. I wrote a few test cases to verify MOV and ADD were working, but the real test will be when I load an actual ROM.

Tomorrow I'll try to tackle branches and memory instructions so the CPU can actually jump around and load data.

— Montasir

Branching

April 24, 2026

Today was all about control flow. Without branch instructions, the CPU just marches forward linearly through memory, which isn't useful for running real code.

I implemented B and BL (branch and branch with link). B just changes the program counter to jump somewhere else. BL does the same thing but also saves the return address in the link register (R14), which is how function calls work.

The offset is encoded in the instruction as a signed 24-bit value, and you have to shift it left by 2 and sign-extend it to get the actual jump distance. I got the math wrong the first time and the CPU started jumping to garbage addresses, but after fixing the sign extension it worked.

I also added BX (branch and exchange), which lets the CPU switch between ARM and THUMB mode. The GBA uses THUMB mode for code density, so this instruction is essential. When the lowest bit of target address is 1, the CPU switches to THUMB mode.

After that, I started on load and store instructions. LDR and STR for single words, LDRB and STRB for bytes, LDRH and STRH for halfwords. These are what let the CPU actually read and write memory through the Bus.

I haven't tested everything yet, but the structure is in place. Tomorrow I'll try to implement the THUMB instruction set so the emulator can handle both modes.

— Montasir

THUMB

April 25, 2026

THUMB instructions are 16 bits instead of 32, which makes them more compact but also more restrictive. They can only access the lower 8 registers (R0-R7) in most cases, and they don't have conditional execution like ARM instructions do.

I added a separate decoder for THUMB mode. It checks the CPSR's T bit to figure out which mode the CPU is in, then decodes accordingly.

THUMB has its own versions of the data processing instructions, but they're simpler. ADD, SUB, MOV, CMP, and all the logical operations are there, just with less flexibility. Branch instructions in THUMB are similar to ARM, but with shorter offsets.

The annoying part was handling the different instruction formats. THUMB has like freaking 19 different formats, and each one encodes operands differently. Some use 3-bit register fields, some use 8-bit immediates, some use offsets. I spent most of the day making sure I was extracting the right bits for each format.

By the end of the day, I had most of THUMB working. I tested it with a few handwritten instruction sequences and confirmed that mode switching was happening correctly.

Tomorrow I may finally work on the PPU so I can see something more than a gradient on screen.

— Montasir

Rendering

April 26, 2026

The PPU (Picture Processing Unit) is what turns memory into pixels. The GBA's PPU supports multiple background layers, sprites, and different graphics modes. I had to reference mGBA because they had perfected the timing and rendering details, which are pretty complex. Today I focused on getting Mode 3 working, which is the simplest: just a 240x160 bitmap in VRAM.

First, I had to map VRAM correctly in the Bus. VRAM starts at 0x06000000 and is 96KB. In Mode 3, the framebuffer is stored as 16-bit RGB values (5 bits per channel), so I updated the PPU to read from VRAM and convert those values to 32-bit RGBA for SDL.

Then I had to implement the LCD control register (DISPCNT) at 0x04000000. This register tells the PPU which mode to use, which layers are enabled, and other display settings. I added code to read this register and adjust rendering behavior accordingly.

After that, I updated the main loop to call the PPU at the right time. The GBA renders at 60 FPS, with 160 visible scanlines and 68 for VBlank. I added basic timing so the PPU renders one scanline at a time and triggers VBlank at the right moment.

I tested it by loading a ROM that uses Mode 3, and for the first time, I saw actual graphics on screen. They were glitchy and flickering, but they were there. The colors were right, the resolution was right, and it was clearly rendering something intentional.

Tomorrow I'll work on cleaning up the timing and implementing interrupts so the CPU can sync with the display properly.

— Montasir

Timing

April 27, 2026

The CPU and PPU need to stay in sync, and that requires proper timing. The GBA's CPU runs at 16.78 MHz, and the PPU renders at 60 Hz. If the CPU runs too fast or too slow, everything breaks.

I added cycle counting to the CPU. Each instruction now tracks how many cycles it took to execute, and the main loop uses that to throttle the emulation. Different instructions take different amounts of time. Memory access is slower than register operations, for example.

Then I implemented basic interrupt support. The GBA uses interrupts for VBlank, HBlank, timers, and other events. I added the interrupt registers (IE, IF, IME) and wired them into the CPU so it can jump to the interrupt handler when an interrupt fires.

The VBlank interrupt is the most important one for games so to speak. It fires every 1/60th of a second, right after the visible scanlines finish rendering. Games use this to update graphics and logic without tearing.

After getting interrupts working, the glitchy flickering from yesterday went away. The ROM I was testing now renders smoothly, and the frame rate is stable. It's still not perfect, some graphics are missing, and there's no audio. But it's starting to look like a real C++ GBA emulator.

I also spent some time debugging why certain instructions weren't working. Turns out I had a bug in my barrel shifter implementation that was corrupting operands in some cases. Fixed that and a few other small issues.

— Montasir

Reflection

April 28, 2026

It's been around a week since I started EnGBA, and it's wild how much progress happened in such a short time.

The core is solid now. The CPU handles ARM and THUMB instructions, branches, memory access, and interrupts. The PPU can render Mode 3 graphics at 60 FPS. The timing is accurate enough that things don't break immediately.

But there's some stuff missing.

Next I should probably focus on building out the user-facing features. Things like customizable controls, audio volume settings, and visual options (filters, scaling, etc.).

I'm thinking of adding a simple settings menu that lets you:

  • Remap controls
  • Adjust audio volume and sample rate
  • Choose display filters and scaling modes
  • Configure save file locations

It'll probably take a while to get all of that working, but it feels like the right next step. The emulator is functional, but it needs polish to be used seriously.

For now, I'm happy with where things are. I learned a ton, and I can't wait for more.

Image 1

Friends trying out EnGBA for the first time and playing Super Mario Advance 2.

We literally couldn't get passed the second level..

— Montasir

End

Latest

You are on the latest blog

Next

InfiniteCode

February 2026